DEMONSTRATE SIMPLE KAYAKING SKILLS
OBJECTIVES
On completion of this unit, you should be capable of:
• correctly holding a paddle
• correctly using LIFEJACKETs and helmets
• an understanding of the basic differences between various kayak designs
• demonstrating the relevant paddling skills
BACKGROUND
CHOICE OF BOAT
What sort of boat should you paddle? It depends. What sort of paddling do you want to do? The answer to that question will determine the choice of boat, because modern canoes and kayaks are specialised, and none will do everything. Kayaks derive from the hunting craft of the Arctic. The paddler is seated, and uses a double blade paddle. Modern canoes are based on the birchbark craft of the North American natives, and are open boats paddled with single blade paddles. The originals were paddled from a kneeling position, as are modern competition canoes, but for touring a sitting position is more comfortable. The low seating position in a kayak gives stability, and decks fore and aft shed water, so that kayaks can withstand wind and wave better than open canoes. Canoes are usually paddled as doubles, and suitable designs are ideal craft for exploring sheltered lakes, creeks and rivers. Sit-on-top boats have become popular in recent times. They are paddled as kayaks, are easy to get on and off, but do not provide much protection for the paddler. This resource is written for conventional kayaks.
MATERIALS
Two types of materials, composites and rotomoulded polyethylene, are the most common in kayak and canoe construction. Composite materials are a mix of a synthetic resin—polyester, vinyl ester, or epoxy—and a reinforcing fibre— glass, synthetic (e.g. Kevlar®), or carbon. Glass fibre in polyester is the cheapest and most common, and, looked after, will last for many years. Composites of Kevlar and carbon, with epoxy resins, can be lighter and stiffer, but their durability is often questioned. Rotomoulded boats are formed of polyethylene. For the same stiffness, polyethylene must be thicker than a composite, and the earlier rotomoulded boats were heavier and slower than composite craft. The advantage of polyethylene is that boats made of it bounce off rocks almost undamaged. For lightness and performance composite boats have the edge, for the ability to absorb punishment the rotomoulded boats are the better choice. Australian Canoeing Inc Flatwater Ressources Page 21 of 168

DESIGN
Other things being equal (which they will not be), a longer boat will be a faster one. On the other hand, the longer the boat, the less maneuverable it will be. Rocker, the curve of the keel, affects both maneuverability and speed, with more rocker making the boat easier to turn, but slower. Most single sea kayaks are between 4.5 and 5.5 m long, with little rocker, so that they run straight. Whitewater play boats, such as the Dancer®, are between 3 and 3.5 m in length and have considerable rocker: slow over a distance, but able to spin on the spot. Freestyle kayaks are even shorter and more rockered, and slower. The beam (width) and cross section affect lateral stability and speed. Wider boats are slower, but more stable. A boat with flat sections admidships will have good initial stability but less secondary stability, i.e. it will feel stable when upright but ‘tippy’ when on edge. A boat with more V in the midships sections will feel less stable upright, but more stable when edged for turning. Australian Canoeing Inc Flatwater Ressources Page 22 of 168 Deep V sections at bow and stern will give good tracking, the ability to go in a straight line, a characteristic wanted in a touring boat. The lower the decks of a kayak, the less it will be affected by wind, but the internal volume for carrying gear will be less. Any kayak (or other vessel) will tend to wander when travelling downwind. The solution used on some touring kayaks is a rudder. A rudder is not for steering — kayaks are steered by paddle and boat lean — but to trim the boat to run straight downwind. It’s there to reduce the need for continual sweep and other correcting strokes downwind, and therefore to reduce fatigue. Learn to paddle the kayak without using its rudder, so that you can control the boat if the rudder fails (as they have been known to do). All boats must have buoyancy built in. In kayaks that is usually in the form of blocks of expanded plastics, supporting the decks. Air bags either side provide even more buoyancy. Some touring kayaks may have bulkheads and hatches, forming compartments for buoyancy and gear stowage. Virtually all sea kayaks are built this way. Compartments should be filled with buoyancy material (e.g. the liners from wine, spring water, or fruit juice casks) as a ‘fail safe’ measure. All canoes and kayaks will need secure handholds at bow and stern, usually end loops or toggles. All design is compromise... The diagrams give some idea of the range available. For learning to paddle, the usual choices are a whitewater play boat or a touring kayak. In the whitewater boat you will probably learn boat control skills faster, but in the touring craft you will be better able to go places.
OTHER EQUIPMENT
PADDLE
Like boats, paddles come in various shapes and sizes, and are of various materials. Kayak paddles have two blades, usually feathered between 65 ̊ and 90 ̊. The type of boat and paddling determines the kayak paddle length. Slow boats, like the freestyle kayaks, are paddled with short paddles, while sea kayak paddles are quite long, 230cm or so. The reason is to maintain a comfortable cadence (rate of paddling) in the slower or faster boat. Blade shapes may vary, but the asymmetric shape, which reduces twisting, is now common in kayak paddles. Blades may be of composite construction or injection moulded. Cheaper shafts are of aluminium, with carbon fibre and Kevlar composites favoured materials for quality shafts. There will either be an oval section or a formed hand grip to help give instinctive location in the hands. In flatwater competition, kayak paddles are the ‘wing’ or ‘propeller’ type which slip less in the water in forward paddling. They do not work well in other strokes. You may have the paddle in your hands for hours on end, so the lighter it is, bearing in mind the need to be strong and durable, the better. It pays to spend a bit more on a quality paddle.
PERSONAL FLOTATION DEVICE
You will need an approved Type 2 or 3 LIFEJACKET. (The differences relate to safety colours, etc.) It must fit properly and be comfortable. Make sure all zips and buckles are secure, and stay that way. The LIFEJACKET will not save your life. It will support you in the water, and also give some protection if you are washed on to rocks. Pockets are useful for small items when touring, but beware of filling them with heavy and unnecessary items that will get in the way during rescues. A whistle on a cord is a good idea.
SPRAY DECK
The two main materials are neoprene and proofed nylon or other synthetic fabric. Neoprene decks seal better, but can be less durable. They would be a better choice for paddling in heavy conditions, but a nylon deck may be more comfortable in light conditions in hot weather.
CLOTHING
As in all outdoor activities, you will need to dress for the conditions, and this normally means some kind of layer system. There is a wide range of clothing available, both in design and fabric, and you will need to choose according to the need for sun protection (e.g. Lycra® rash top) or insulation. Modern synthetics give some insulation when wet, and wick moisture away from the skin. Avoid cotton. In cool weather you will need a windproof jacket, preferably with good one without sleeves to prevent chafing. The ‘long john’ style is the usual. If you are in doubt, take the pessemistic view and add a layer. On the water, it is usually easier to take off a layer than add one. Carry spare clothing in the boat for when you arrive, or to cover contingencies.
FOOTWEAR
You may find yourself walking on sharp rocks, broken shells (or glass) and other uncomfortable surfaces. There is a wide range of wetsuit boots, aquatic sports shoes and sandals available. Old sneakers are often worn, although they tend to be bulky. Choose something that is comfortable both on the ground (and does not pull off in mud) and in the boat, remembering that straps and laces must not tangle in footrests.
SUN PROTECTION
As a paddler, you are very much out in the open, exposed not only to direct radiation but also what is reflected from the water surface. Long sleeves and either a hat with full brim, legionnaire-style cap, or keffiyeh-style headwear, tied on, at the very least. Sunscreen on all exposed skin, including the lips, reap plied regularly as required. To cover the backs of the hands, fingerless and palmless gloves give protection without affecting paddle feel. Sunglasses to protect the eyes from the UV. If you wear a helmet, as in surfing, a visor gives some protection, and sunscreen will be required as well.
BOAT SETUP
From whitewater paddling we have the notion of ‘wearing’ the boat, to the extent of being strapped together in the case of C boats. All very well for a run down the rapid, but not necessarily for flatwater paddling. You will need to set up the footrest, back strap (if present) and thigh braces so that you can sit comfortably relaxed, with room to wriggle, yet can brace when necessary in rough water. The footrest should be set so that the knees are slightly bent, with the thighs against the thigh braces without pressure, and the ankles relaxed. The backstrap, if there is one, should be against the lower back, but again without pressure. To brace, extend the feet to tighten everything all round. If necessary, pad the sides of the seat so that you do not slide from side to side. You want to be firm, but not tight. to set up the footrest, back strap (if present) and thigh braces so that you can sit comfortably relaxed, with room to wriggle, yet can brace when necessary in rough water. The footrest should be set so that the knees are slightly bent, with the thighs against the thigh braces without pressure, and the ankles relaxed. The backstrap, if there is one, should be against the lower back, but again without pressure. To brace, extend the feet to tighten everything all round. If necessary, pad the sides of the seat so that you do not slide from side to side. You want to be firm, but not tight.
STOWING GEAR
Clothing, camping gear, food, and other items are carried in waterproof bags or other containers in the fore or aft compartments. Various sizes of waterproof bags are available, and you should choose according to the size of your boat and what you need to carry. Generally, several small containers are better than one large one. You will need to pack according to where you are going, the duration of the trip, and so on, with reserves to cover contingencies. Lighter gear should go in the ends of the boat, heavier items such as water, cans, and so on, amidships. This means that handling of the boat in waves will be affected less, and stowing heavy items low will aid stability. Nothing must be able to move about and affect trim. It goes without saying that first aid kits and similar gear will be readily accessible. The only items on deck should be map or chart and other navigation items, paddle park, spare paddle, towline, and so on, all secure. Communications gear is perhaps best in a LIFEJACKET pocket.
INSPECTION AND MAINTENANCE
Before you launch, check that the rudder (if there is one) and everything else is in working order. After the paddle, wash and clean everything, and make sure that sand and grit have been removed from any moving parts: rudder and pedals, sliding footrests, and so on. Check that toggle cords and other ropes and cords are not frayed, and moving parts are not excessively worn. Check the paddle, LIFEJACKET, spraydeck, and all other gear. If anything didn’t work properly on the water or needs attention, fix it. Store everything appropriately, with the boat under cover.
PADDLING
You can be on the water for hours on end: for comfort and safety it pays to have an efficient, relaxed style that maximises power and minimises fatigue, strain and injury. Our understanding of the mechanics and biomechanics of paddling has greatly increased in recent years, thanks to the work of coaches in the competitive disciplines, particularly in flatwater racing. What follows for forward paddling, therefore, is a condensation of the instruction given to sprint and marathon paddlers. If you can arrange it, time spent in a K1 or TK1 under the watchful eye of a Flatwater Coach will be well repaid. (It will also sharpen your reflexes!) Correct setup of the boat has already been discussed. Correct ergonomics and posture are essential for paddling, and the diagram shows how you should look in a kayak or on a sit-on-top: slight forward lean (5–8 ̊) from the pelvis, back straight without being forced, shoulders ahead of hips, head, neck and shoulders relaxed. The legs are slightly bent, enough that you can’t quite push them straight without moving on the seat. Lean too far forward and you restrict movement and lung capacity, lean back and again you will restrict movement (and perhaps cause injury). Where are your most powerful muscles? No, not the arms. In paddling, your arms are little more than the linkage between the power source, the muscles of the body, and the paddle. Your arms are there to put the paddle into the water and take it out again: power comes from body rotation, right from the toes. It’s body rotation that shares the load between the muscles, and smoothly produces more power and length of stroke. That’s true of all strokes. (In a flatwater kayak it’s possible to rotate the backside on the seat, indeed, some K1s have pivoting seats. That’s not always easy in other kayaks, but if you can set up the seat to allow that movement it will help.)

THE ‘PADDLER’S BOX’
The shoulder is the joint in the body with the greatest range of movement. It is also the most susceptible to dislocation and other injury. To reduce the likelihood of injury, and also to develop the most power, the elbows should always be in front of the line of the shoulders, and for some strokes (e.g. high support) held low. The roughly rectangular volume in which the hands work is called the paddler’s box, and that space rotates with the shoulders. If you want the paddle blade behind you, as in reverse strokes, it means that you rotate the body so that your elbows remain in front of the line of the shoulders. Several things before you go too far...
CARRYING THE BOAT
The safest way is to have a person at each end. (Remember that end loops and toggles are really there to give you a safe handhold when you and the boat are in the water together.) Over a short distance a kayak can be carried like a suitcase, and a light boat can be carried on one shoulder. Use two hands for the lift. To pick up the paddle, hook a toe under the middle of the shaft and lift.
LAUNCHING
The easiest way to launch a kayak (the only way at sea) is to place it, facing the water, at the top of the swash zone on the beach. Park the paddle either on deck or alongside, being careful it isn’t washed away. Sit astride the boat, wash the sand off your feet, and put them into the cockpit. Then with knees straight and weight supported on your hands, slide in. Fit the spraycover, aft end first. When you’re ready, and with the waves, ‘walk’ the boat on your hands until you’re afloat. Paddle away. (Yes, the boat will be scratched. Get over it.)
On a beach with surf you will have to time things carefully. The other way is to have the boat afloat, parallel to the shore. Put the paddle across the deck behind the cockpit, with the blade on the ground facing upwards, to act as an outrigger. Sit over the aft end of the cockpit,
wash off any sand or mud, and put your feet in, then with weight on

CAPSIZE
Capsizing is part of kayaking, and the sooner you experience a controlled capsize the better. On a course, your instructor will supervise, and will probably have some exercises. If the water is cold, you may want to prepare yourself with a few splashes, and swimming goggles or masks may make things more comfortable. Your first capsizes will be without a spraycover. Keep hold of your paddle and lean to one side or the other until the boat capsizes. When it has stabilized inverted, tuck the paddle under one arm. Lean forward, grab the spraycover strap and release the spraycover. Put your two hands on the deck behind you, straighten your knees, and, rolling forward, push the boat away from you. While this is going on, hum a tune to help keep most water out of your nose. Come up alongside the boat, paddle still under one arm, and take hold of the boat. Work your way along the deckline if there is one to the bow. Let go of anything and it will drift faster than you can swim. Either swim the boat ashore, keeping to seaward of it, or await rescue. Leave the boat upside-down until you reach shore. Some instructors will want you to put your hands in the air and bang on the hull while you are upside down: a
good confidence exercise. When you capsize unexpectedly remember to tuck forward and not lean back. Tucking forward is a much safer
position when you are being churned around, especially in shallow water. Don’t be afraid of being trapped in the boat. Capsized in rough water the challenge may be to stay in: get it wrong and you can be thrown out.

EMPTYING OUT
The easiest and safest method is to have a person at each end, raising and lowering alternately. Hold the boat about half a metre in from the end so that it does not roll upright. On a steep bank you may be able to empty the boat by raising and lowering the end nearer the water. A light kayak can be rocked on one thigh.

FORWARD PADDLING
You want to go places, so forward paddling is the important stroke, and is usually described in three phases.
CATCH
The catch is the start of the stroke, the entry of the blade into the water. The key points are:
• clean entry, as far ahead of the feet as possible, with the blade as vertical as possible
• full rotation of the torso, bottom hand shoulder forward
• quick development of power
Think about:
• taking the blade to the water: the bottom hand takes the blade to the water in a spearing motion, with the top hand following the shaft movement, but not pushing the blade in
• squaring the blade: the blade must be at right angles to the direction of travel—if the angle is wrong the blade will slide sideways
• burying the blade: completely immerse the blade as quickly as possible, keeping the bottom hand several centimetres clear of the water throughout the stroke
POWER
Think of the blade as being fixed in the water: you pull the boat past it. From the catch, the stroke is ‘taken’ by the whole ‘pulling’ side of the body — toes, leg, hip, torso, and shoulder — all working smoothly together. The bottom arm remains in a fairly extended extended position throughout this phase, with the top arm, elbow bent, and hand at around eye height and 30 – 40 cm in front of the head, following the rotation of the shoulders. Flatwater paddlers talk of the ‘frame’, the arms and shoulders, remaining fixed through this phase: in other words the elbows are not bending or straightening but remaining at the same angles. The top hand does not push, it follows the shoulders. The blade will tend to follow the bow wave of the kayak, moving about 5cm away from the boat, during the stroke. A blade that moves straight back, relative to the boat, may be a sign of insufficient body rotation.


EXIT AND RECOVERY
The stroke is finished when body rotation is complete. Taking the stroke too far is simply wasted effort. At exit,the blade moves out of the water to the side, with the top hand still high and the bottom elbow bending to lift the blade. That elbow should stay low and relaxed. At this stage the paddle is parallel to the centreline of the boat, but over the side. You are now in position to set up for the catch on the other side, where the stroke is a mirror image.
TOURING STROKES
When you’re paddling for hours on end you will prefer a more relaxed stroke. All the principles described above still apply, but the stroke will be a little lower and wider, with the top hand lower. In windy conditions a lower stroke is safer and more stable, with the top blade less exposed to crosswinds, and with the blade in the water able to provide a little support.
Key points
To revise:
• plant the blade by or ahead of the feet, bottom arm extended but not straight
• rotate the torso to pull back the shoulder and drive the stroke
• the top arm holds its position relative to the shoulders, crossing the boat with the shoulder rotation
• the power phase ends with the blade in line with the hips
• lift the blade out sideways
• keep the top hand high
• rotation continues, to set the shoulders and paddle for the next stroke
Things to avoid:
• excessively long strokes
• punching or dropping the top hand
SWEEP STROKES
Sweep strokes are the main strokes for turning the boat at low speed, either to manouvre into position or to keep the boat running straight. Many instructors prefer to start with the forward sweep so that students can have some confidence that they can control the direction of the boat before they concentrate on forward paddling. As with other strokes, power comes from the torso muscles, but here the stroke will be a long wide arc, the longer and wider the better. For a forward sweep, twist to reach forward and put the blade in as close to the bow as
possible. The lower arm is slightly flexed, the top hand low, just high enough to clear the deck. The blade should
be completely immersed, just beneath the surface. Apply power by twisting the body in the opposite direction, keeping shoulder and elbow angles fixed, so that the blade moves (relative to the boat) in a wide arc all the way to the stern. While you are learning, watch the blade all the way around so that you develop the full twist necessary. The reverse sweep works the same way, but in the opposite direction. Begin by twisting so that the whole paddle is over the side and put the blade in close to the stern. (No, don’t change your grip on the paddle: all reverse
strokes are with the back of the blade.) Now twist the other way to move the blade in a wide arc all the way to the bow. In many cases a series of forward or reverse sweep strokes can be used to control the boat. When you want to turn on the spot, alternate forward sweep on one side with reverse on the other. As you develop confidence, look where you are going rather than watching the blade through its arc. Later you will also want to put a sea or touring kayak on edge as you sweep to increase its rate of turn, and in waves you will sweep on wave crests when bow and stern are out of the water.
EDGING
Putting a kayak on edge changes its underwater shape, helping it turn more easily. In the case of sea kayaks, the deep V sections at bow and stern are lifted and rocker increases. To edge a kayak, use the muscles of hip, torso and legs to roll the kayak slightly while you keep your upper body upright. This is often called ‘J lean’ because of the shape of the spine. Lift your left knee to lower the the right side of the boat for sweep strokes on the right. This means that the boat is leaned outwards from the turn: the opposite to the way a bicycle is leaned.

PADDLING STRAIGHT
Kayaks, particularly the whitewater types, appear to have minds of their own, wandering all over the place. Paddle behind an experienced paddler and you’ll see that the boat does not travel in a straight line but yaws from side to side with each stroke, and that each stroke is a little different, perhaps a little wider, perhaps a little closer to the boat, so that the end result is a smooth movement across the water. You may see some edging used. That comes with practice. At first you will tend to overcorrect too late. Be patient, make sure you are paddling evenly on each side, and be prepared to make a forward stroke into something of a sweep stroke when the bow wanders a bit too far. Don’t watch the bow, but focus on a spot well ahead. Don’t rush, but pause between strokes to see what the boat is doing, and perhaps give it time to come back into line. Anticipate. Into wind, you shouldn’t have too much trouble keeping straight. Downwind, and it can be a different story. This is why sea boats have rudders or retractable fins. Use sweep strokes wherever possible. The alternative is the stern rudder stroke.

STERN RUDDER
In this stroke the blade is used as a control surface rather than to apply power. It therefore slows the boat. The position is similar to the starting position for a reverse sweep, with the body twisted towards the paddle side. Often the blade will be trailed into that position at the end of a forward stroke. The blade is trailed in the water, with slight outwards pressure so that the boat turns towards the paddle side. (By changing the angles, the boat can also be made to turn the other way.) When the boat is facing the desired direction, return to forward paddling.
REVERSE PADDLING
There will be times when you will want to back into or out of some situation. The reverse stroke begins in much the same position as a reverse sweep, but instead of sweeping wide is kept closer to the boat for more power. As you twist to put the blade in on one side look over that shoulder so that you know what’s behind you. Don’t look over both shoulders: you’ll drive yourself giddy. Remember: power from torso twist —your arms are just the linkage.
EMERGENCY STOP
Short, sharp reverse strokes will stop a forwards moving kayak. Put the blade in close to the hips rather than well behind. The number of strokes doesn’t matter: the important thing is to stop the boat quickly without it turning one way or the other. In reverse, a couple of short, sharp forward strokes will stop the boat. DRAW STROKE You may want to go sideways towards or away from a jetty or raft of kayaks. The draw stroke is the method. Begin by twisting the way you want to move. Reach out at right angles with the blade, with the top hand high, and over the side of the boat: the more vertical the paddle the more effective the stroke. Draw the blade towards the boat, but before it reaches the hull lift the wrists to rotate the blade 90 ̊. Slice the blade outwards again for the next stroke. The work is done with the lower arm, with the upper remaining steady. Control the direction with blade position: towards the bow will turn the boat one way, towards the stern the other. Just right and the boat will go straight. For the present, keep the boat flat. Some sea boats go sideways more easily if edged slightly towards the direction of travel. (Low volume whitewater boats are edged the other way, to avoid being pulled under.)

VARIATIONS
SCULLING DRAW
The sculling draw is perhaps the most useful variation for moving sideways, and is a good exercise in understanding and control. The position is similar to that for a normal draw stroke, but the blade is moved fore and aft parallel to the boat, about 25cm from the hull. As the blade changes direction the angle is changed, so that the blade is always ‘climbing’, drawing the boat sideways continuously. Begin with a small angle, and remember that the blade moves more or less in a straight line, not an arc.
BOW DRAW
Draw strokes made well forward can be used to move the bow one way or the other, either to line the boat up with a raft, or to avoid an obstacle. Apart from the blade position, the stroke is the same as a normal draw stroke.
BOW RUDDER
The bow rudder stroke uses a position similar to that of the bow draw, but the blade is held at an angle to the water flowing past the boat, turning the boat to the paddle side. The drive face of the blade faces the bow, which means the wrists have to be rotated back. A turn with bow rudder is usually started with a forward sweep on the opposite side: e.g. to turn left, a forward sweep on the right followed by bow rudder on the left. When the boat has turned sufficiently, lift the wrists and paddle forwards.

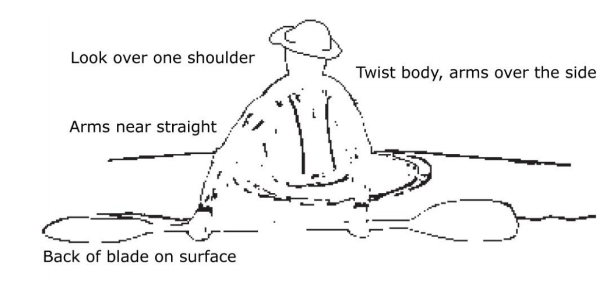
LOW SUPPORT
This is for those situations when you are about to go in. As with the other strokes, the key is body movement, and certainly not brute force. The back of the blade is placed on the water, with the shaft low and near horizontal, wrist straight and elbows above the shaft. The boat is righted with hip movement (the ‘hip flick’), with the blade on the water simply being something to react against
.Don’t try to lift your head — the natural reaction — but bring it up last: boat first, head last. Drop your wrists to slice the blade up again. To practise this, sit comfortably, then lean until the boat becomes unstable, Recover. Try it on the opposite side. Another way to practise is in pairs, with your partner standing in hip-deep water and holding the aft end of your boat. Your task is to remain upright while your partner tries to tip you

Another good exercise is the low brace turn. Begin by paddling forward, then make a forward sweep to begin the turn. Now put the boat on edge, on the side away from the initial sweep, and support yourself with a low brace. As the boat slows, right it with hip movement and resume forward paddling. The low support is also the stroke you will use as you are pushed sideways in small surf. Lean the boat into the waves, and support yourself on the blade. (Lean away from the wave and the capsize will be instant.)

